Taking Your Exam
This step-by-step guide will assist you in finding your exam, navigating through the check-in process, and taking your exam using the Examity software.
I’m having problems sharing my screen, what do I do?
We have a full guide for sharing your screen that answers many common issues, you can find it here.
I think MacOS is preventing me from sharing my screen.
This is a common problem for first-time test-takers, check our guide below for instructions on how to enable screen sharing for Chrome in MacOS.
My proctor hasn’t arrived yet, what should I do?
Your proctor should arrive within five minutes. If your proctor is taking more than five minutes to arrive reach out to support through the chat.
I was disconnected from Examity while taking my exam, what should I do?
There is a 15-minute window to reconnect to an exam session. Log back into your exam dashboard and click the “Return to exam” button on your exam card. If you do not see a “Return to exam” button your session may have expired and you should contact the support chat for assistance.
What kind of identification do I need to provide?
You will need to provide the same ID used when creating your Examity profile. You can find the ID in your profile settings.
I can’t find the identification I used when I created my profile, what should I do?
Depending on your school or program, you may be able to update the profile ID in your profile settings. You will need to update your profile with a clear image of a photo ID. Check with your school or program for what kinds of identification they will accept.
I have finished my exam, what do I do now?
Your school or program will have the results of your exam. No further action on your part should be required unless otherwise indicated in your exam instructions. If you have other questions check our post-exam FAQ.
Automatic System Check
When you first arrive we will perform a basic system check, this is to ensure your device has everything it needs to be able to take an exam with Examity.

The system check will automatically cycle through a short checklist of required items, if all icons turn green then you are ready to test! if any of the required items are not found you will not be able to take an exam, though you can still schedule or interact with your profile.
Selecting an Exam to Take
In this example we are showing two exams, the first has already been scheduled and is ready to be taken. If you need to learn how to schedule an exam check our Scheduling guide here. If you need to see your Exams rules or any accommodations you may have click the “View Exam Rules” link inside the exams card.
In this example we will click the “Connect to proctor” button to begin taking Pop Quiz 1. If this exam did not have a live proctor this would say “Start Exam” instead.
The Exam Check in Progress
Once you have clicked the Connect to Proctor or Start Exam button you will be taken into the check-in workflow. You will be shown several screens that will ask that you follow some simple steps to make your system ready for an exam and to authenticate your identity. Not every exam will require every step shown in this process.
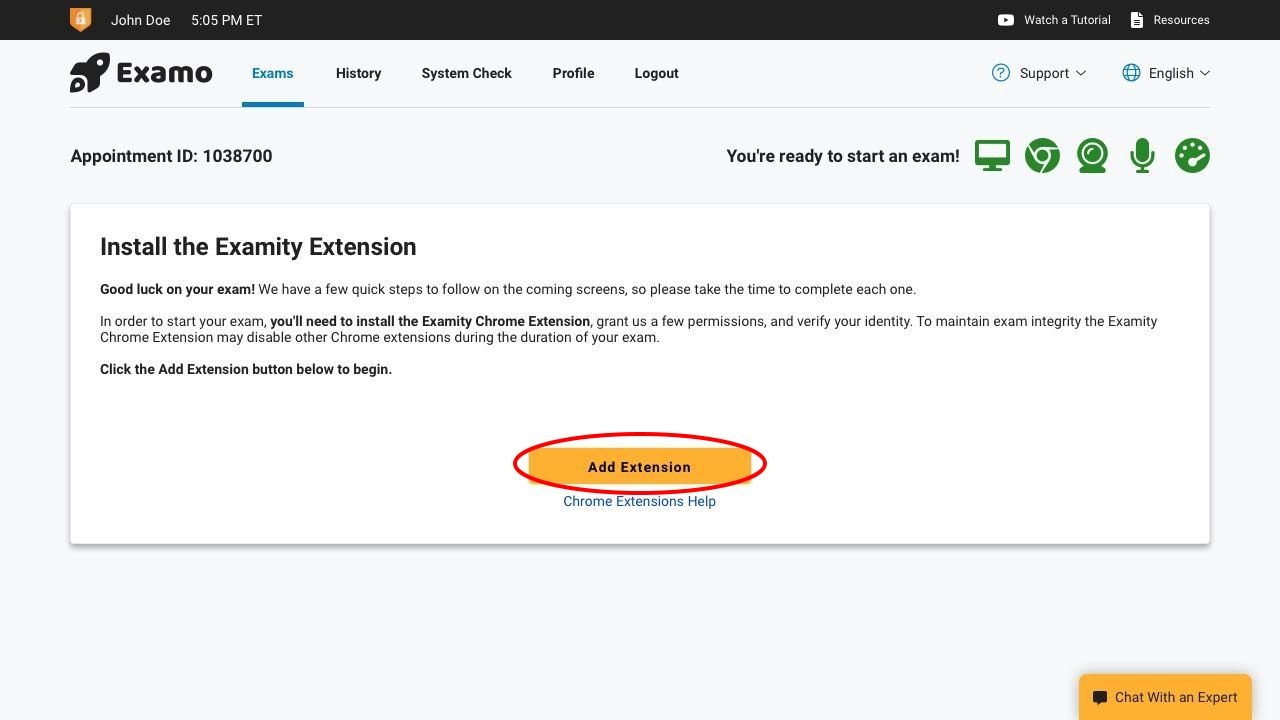
Installing the Examity Extension
Examity uses a Chrome extension to ensure the security of your exam. This extension will uninstall itself once you have finished.
1. Click the “Add Extension” button to begin installation.<
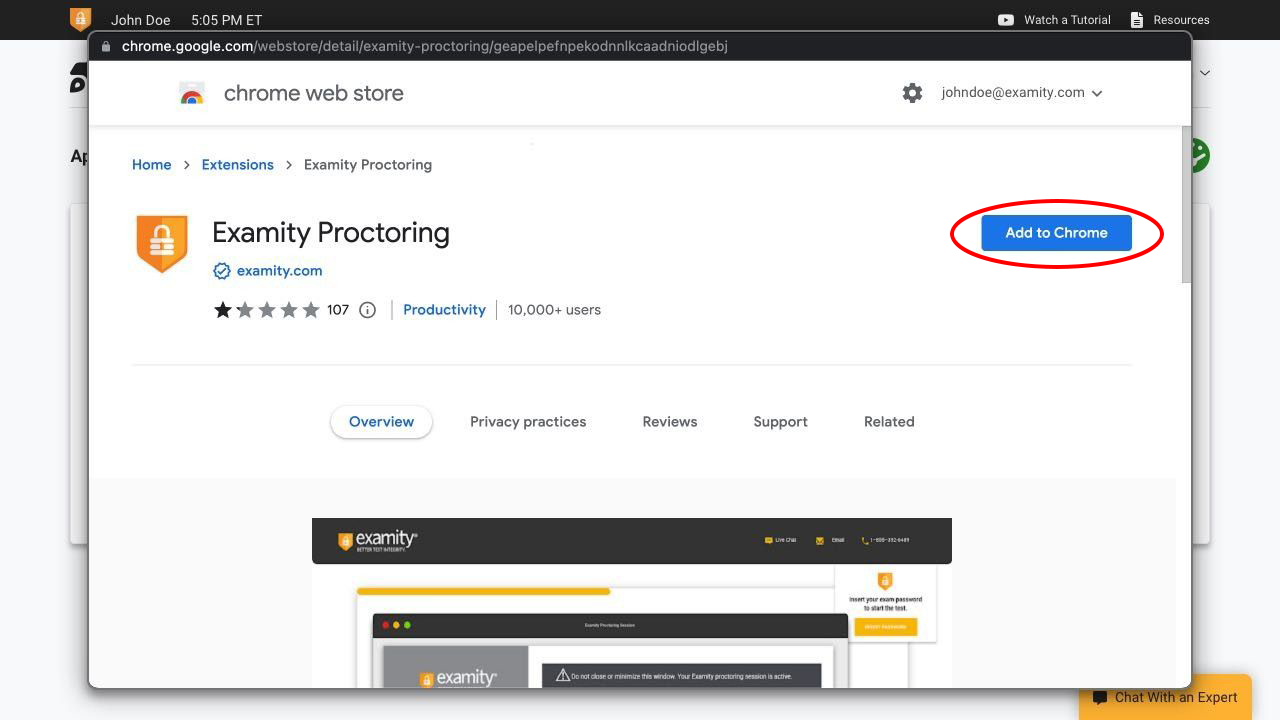
2. The Chrome Web store will pop up, click the “Add to Chrome” button next.
3. Click the “Add Extension” button within the pop-up to confirm installation.
4. Now that the extension has installed click the “Continue” button.
Granting Permissions
Examity uses a Chrome extension to ensure the security of your exam. This extension will uninstall itself once you have finished.
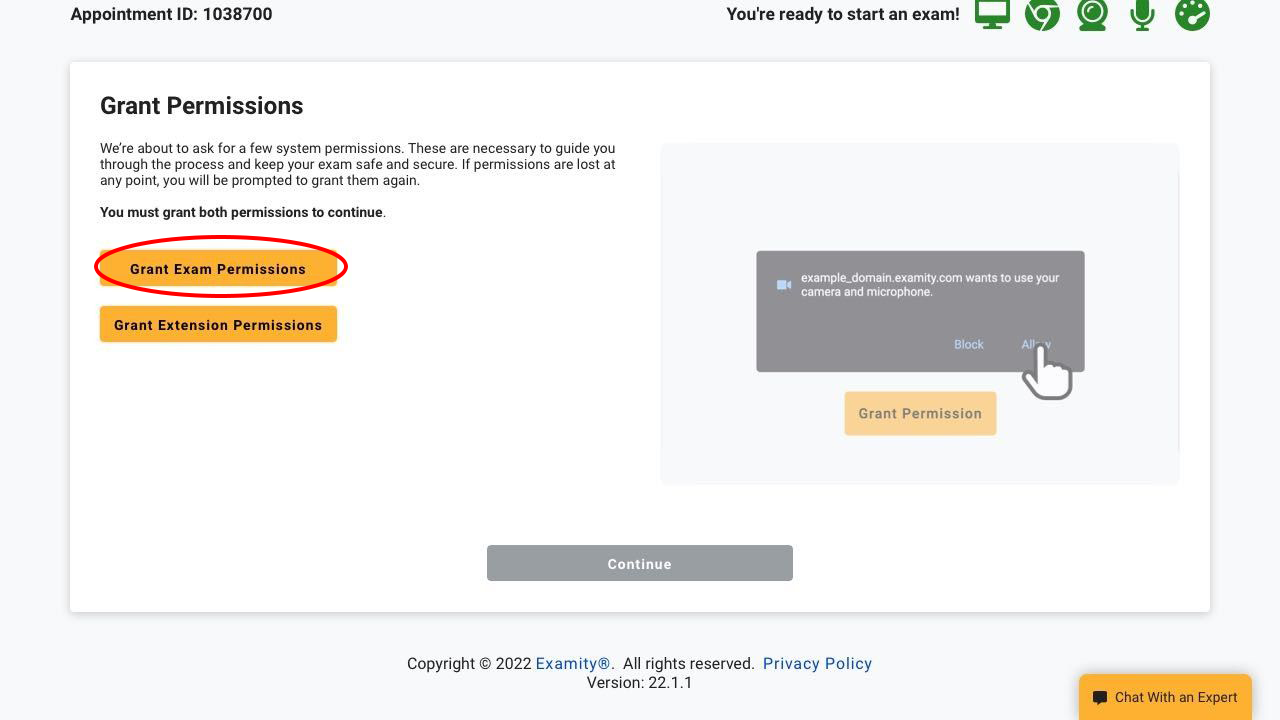
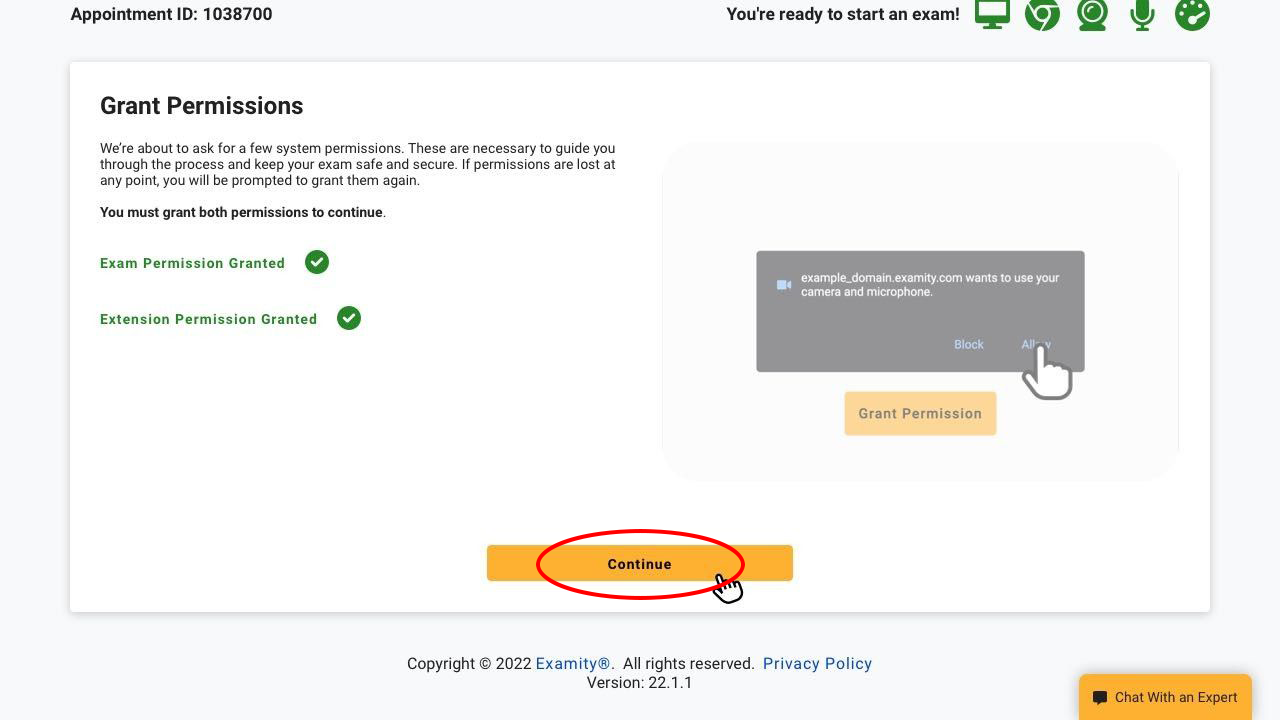
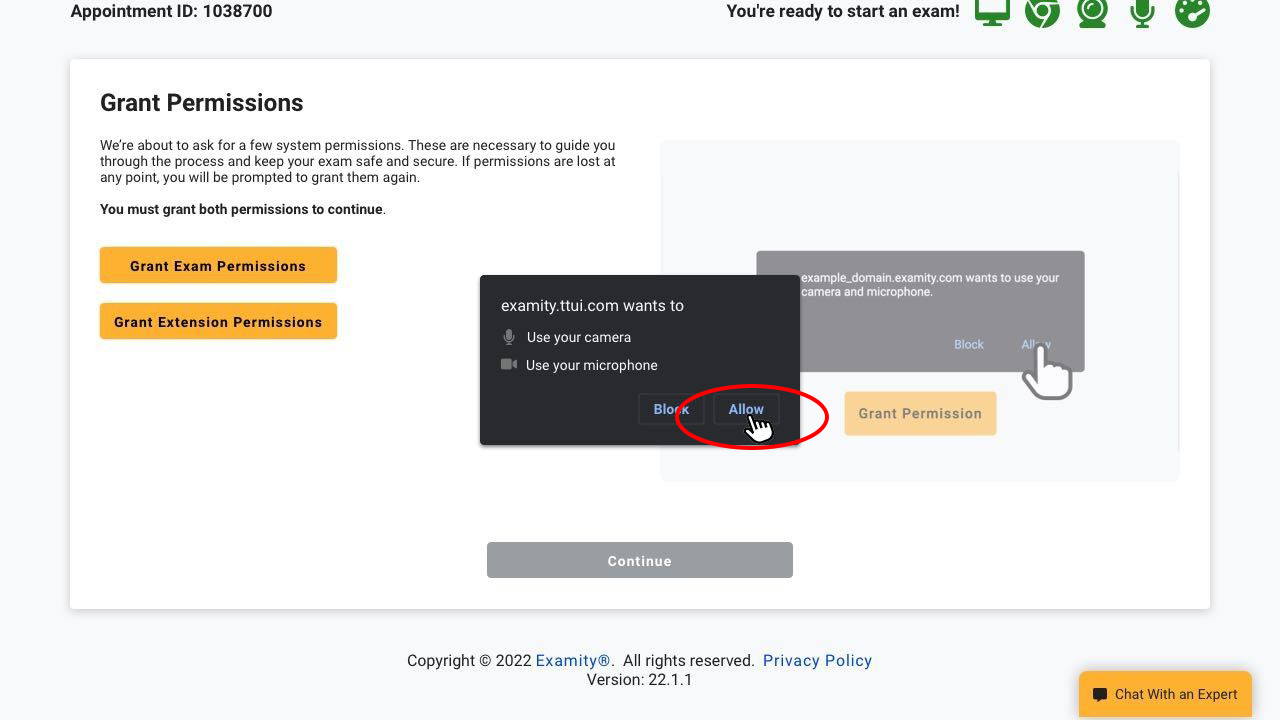
Examity requires permission to use your camera and microphone to enable our proctoring service.
1. Click each “Grant Permissions” buttons.
2. In each pop-up click the “Allow” button.
3. Once you have granted both permissions click the “Continue” button.
ID Verification
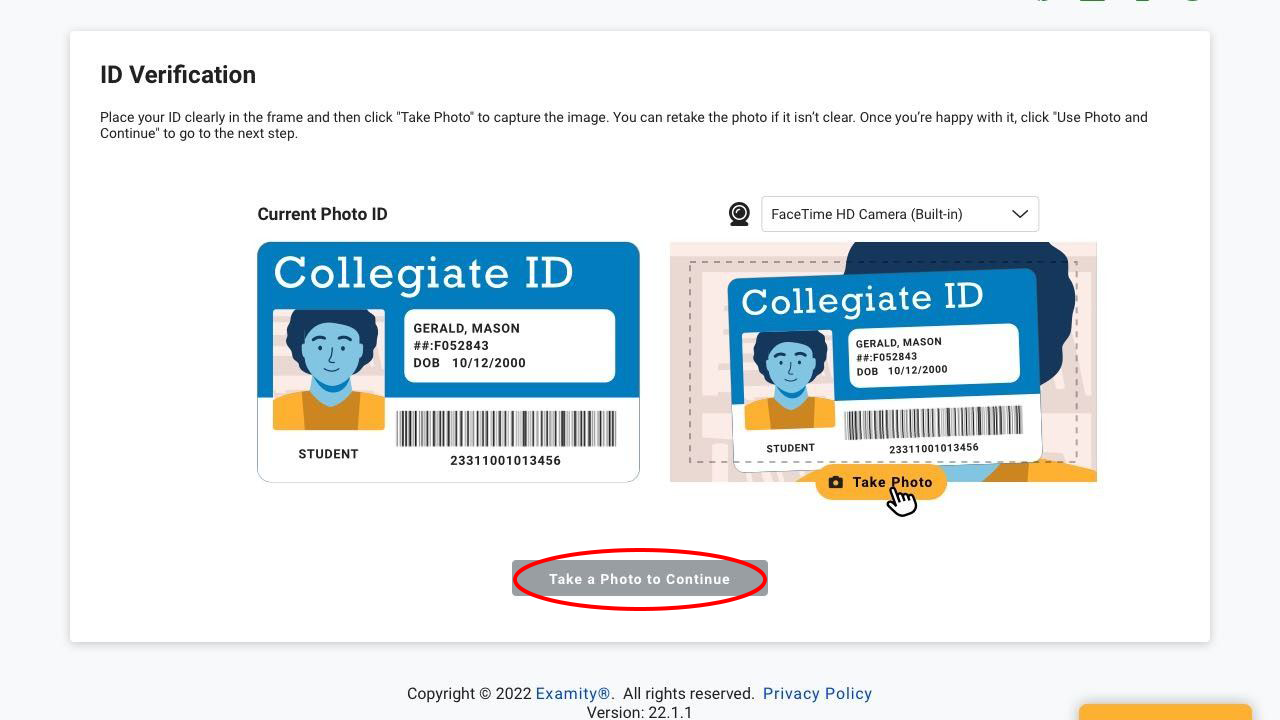
Examity needs to verify your identity before you can begin your exam. Read the directions on screen to confirm which kind of photo your exam requires.
1. Use the viewfinder on screen to center your face or an image of your required identification.
2. Once you are prepared, click the “Take Photo” button.
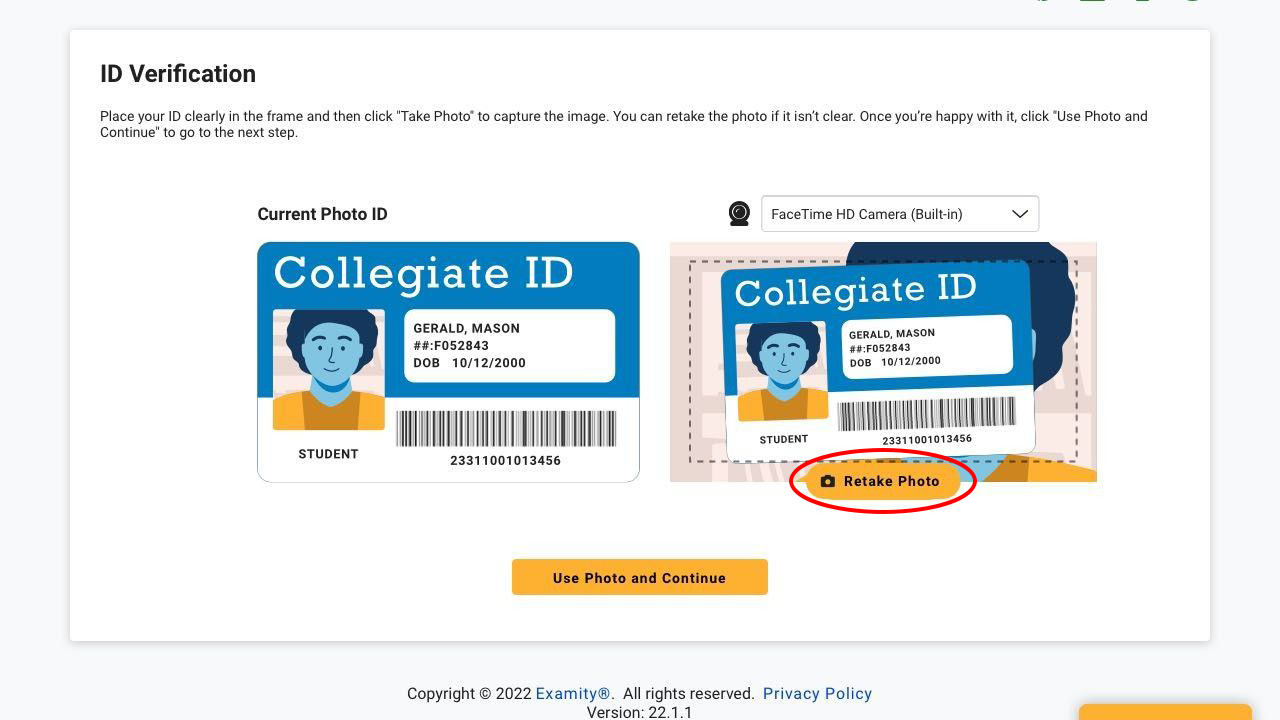
3. Make sure the image is well lit, clear, and in focus. If it is not click the “Retake Photo” button.
4. When you are satisfied with your image click “Use Photo and Continue” button.
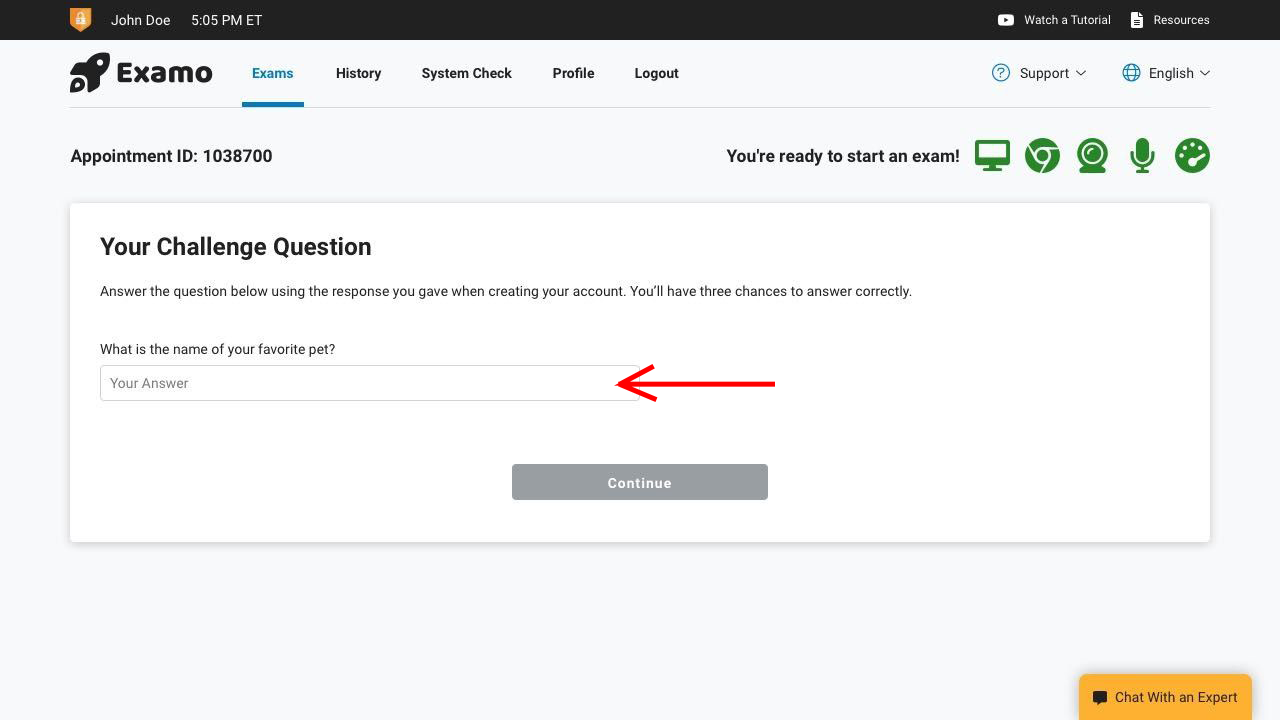
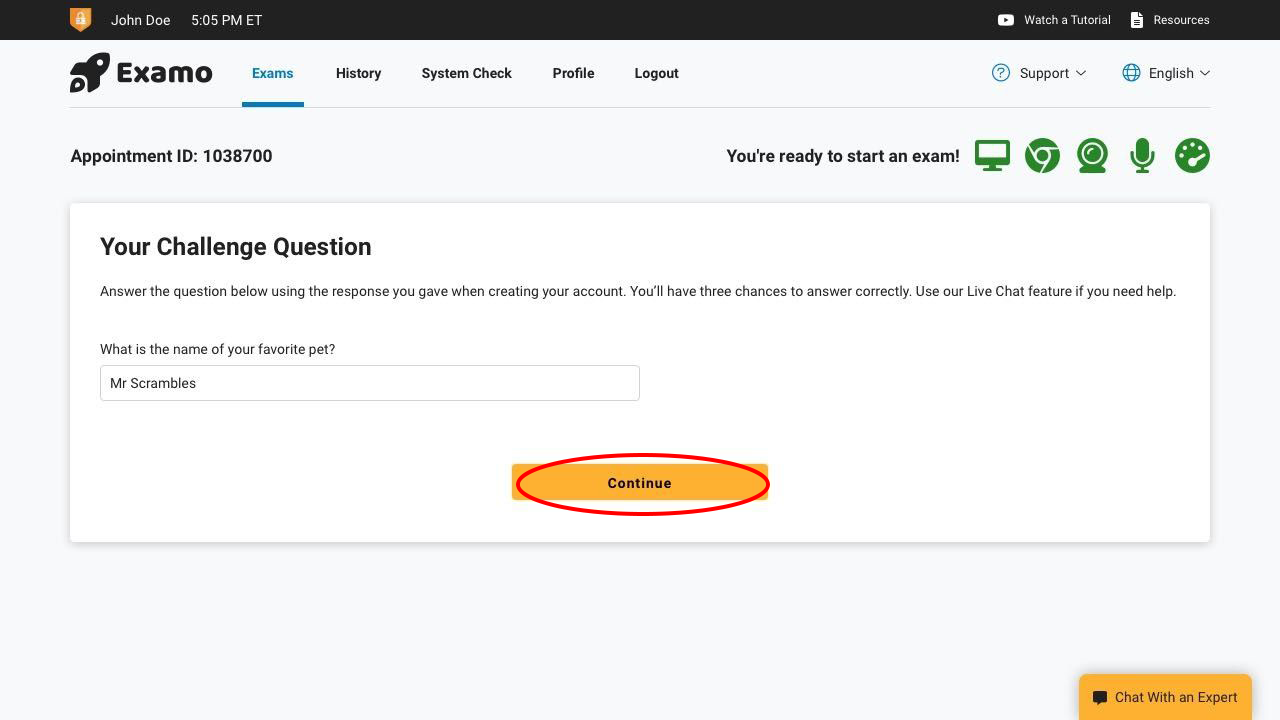
Challenge Questions
Your exam may require you to answer a challenge question that you provided as part of your profile setup.
1. Enter the answer to your challenge question in the field.
2. Once you have added your answer click the “continue” button.
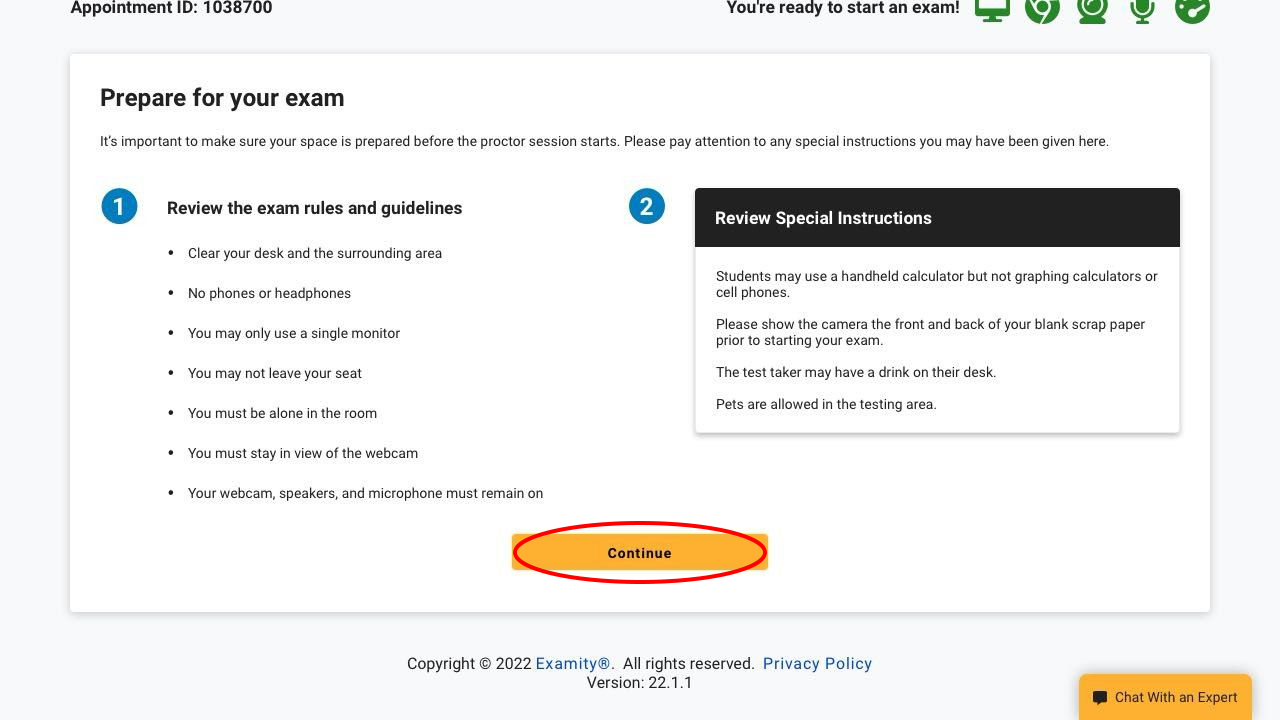
Rules & Special Instructions
Please review the exam rules and guidelines as well as any special instructions your exam may have.
1. Read through the rules & Guidelines as well as any special instructions your exam may have
2. If downloads are present download all required files
3. Once you’ve reviewed the rules and guidelines for your exam click the “continue” button.
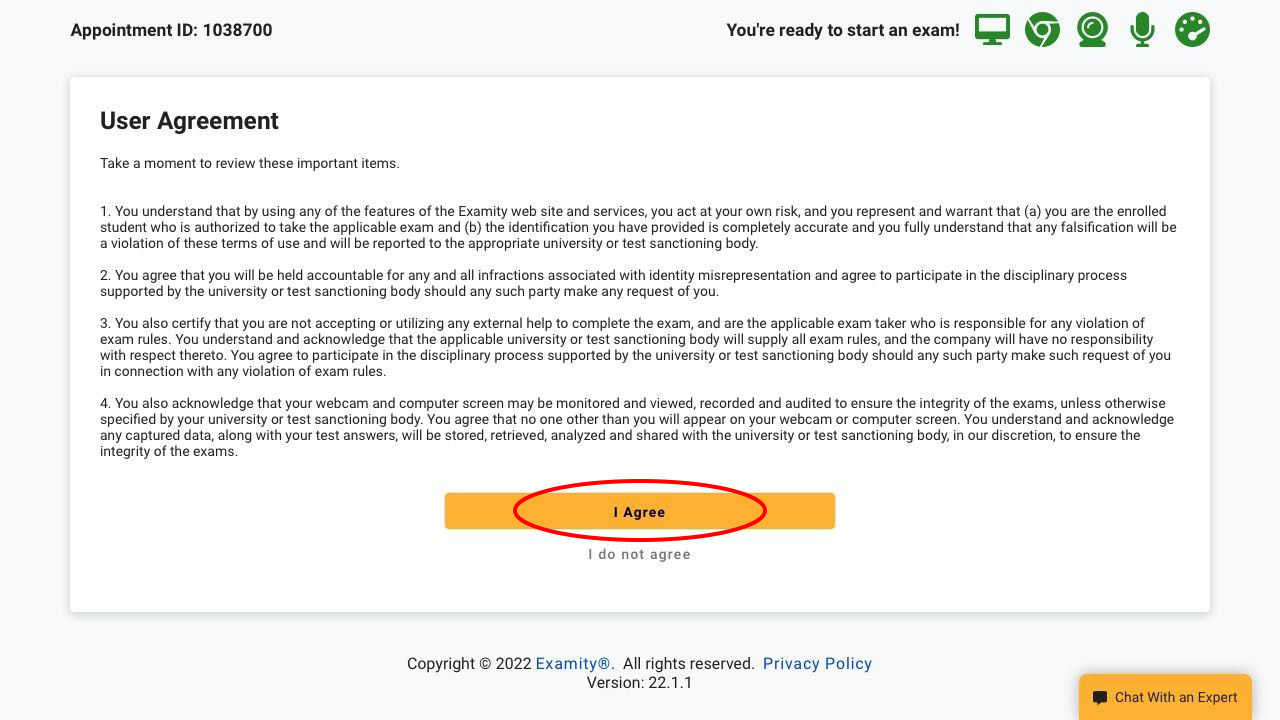
User Agreement
You’ll need to read and accept the Examity user agreement.
1. Review the Examity User Agreement
2. Once you have reviewed the Examity User Agreement click the “I Agree” button.
Taking Your Exam
Once you have shared your screen you will be forwarded into the Exam Lobby. Take the time to familiarize yourself with the Examity sidebar before you begin your exam.
The Exam Lobby
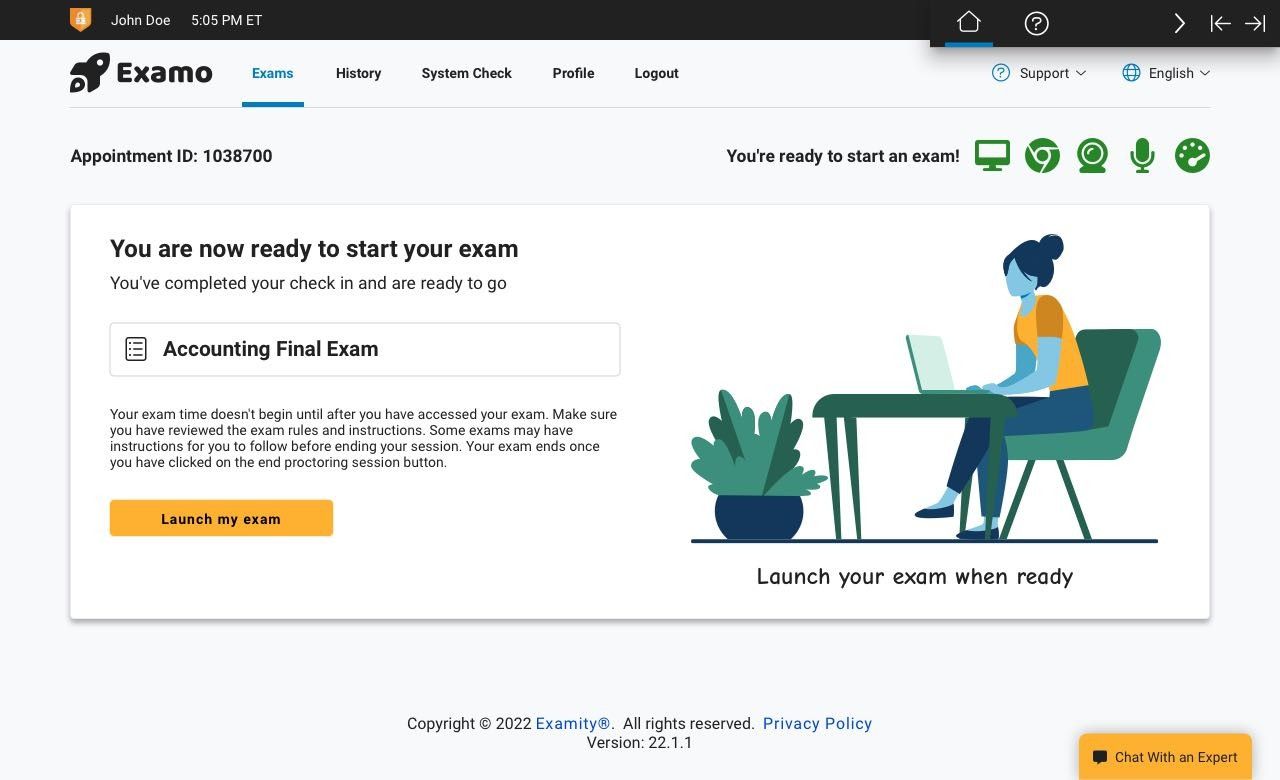
One you are through the check-in process you will be placed in the waiting room for your exam. If your exam is proctored you will need to wait a few seconds for your proctor to arrive. They will then guide you through the remaining steps. If your exam is an auto-proctor exam then you can enter your exam when you feel ready by clicking the “Launch my exam” button.
- If your exam is a live proctored exam you will need to wait for your proctor to arrive. They will guide you through additional steps before taking you into your exam.
- If your exam is an auto-proctored exam then you can enter your exam when you feel ready.
The Exam Sidebar
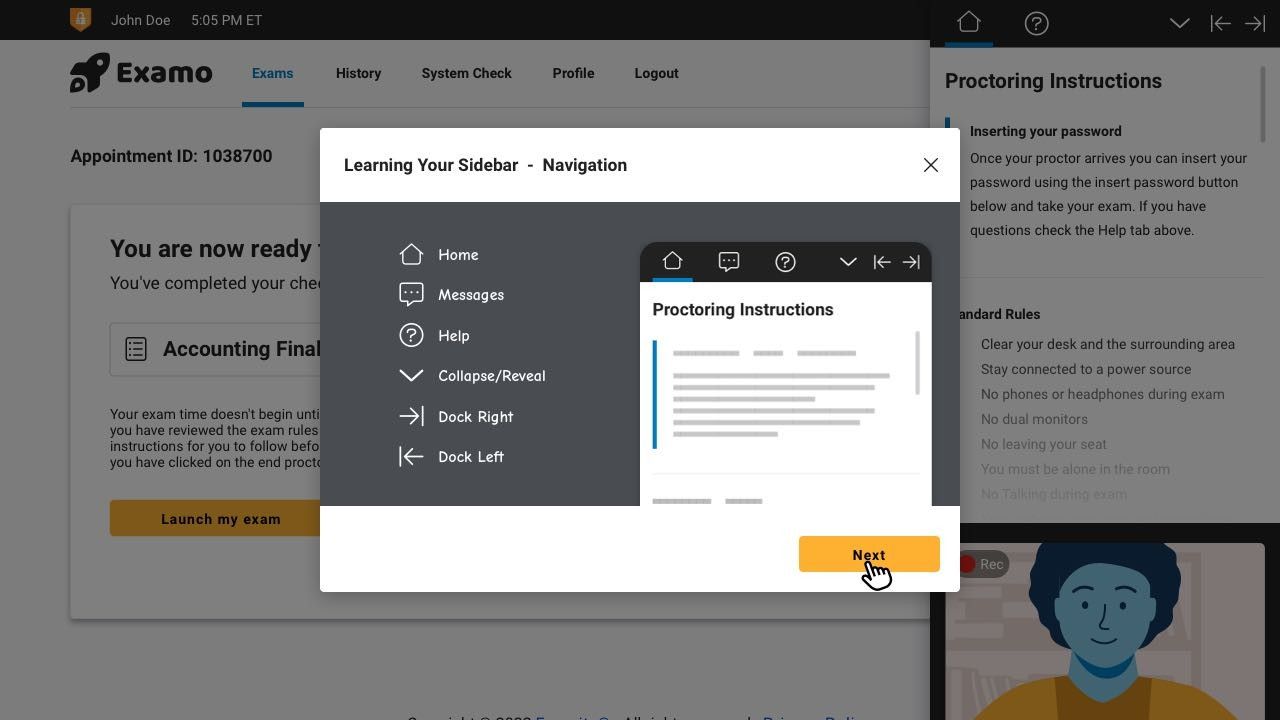
When you first arrive in the lobby you will be shown a quick tutorial demonstrating how to use the Examity Sidebar. Please read through it. You can dock your sidebar to either side of the screen, or collapse it so that it isn’t blocking your exam. You can also access support chat from within the sidebar if you need help.
- You can dock your Exam Sidebar to either side of the screen or collapse and expand it.
- The sidebar contains helpful information about your exam as well as a link to support chat.
- The sidebar contains controls for your camera and microphone.
- The sidebar contains the button you will need to insert your password or passcode as well as the button to end your exam session.
Your Exam
You have now accessed your exam. Most exams are password or passcode protected, once your exam page loads you will need to insert your password or passcode and then submit it. Once you have finished with your exam you will need to end your proctoring session. If you need help you can reach out to your proctor if you have one, or use our live chat at any time.
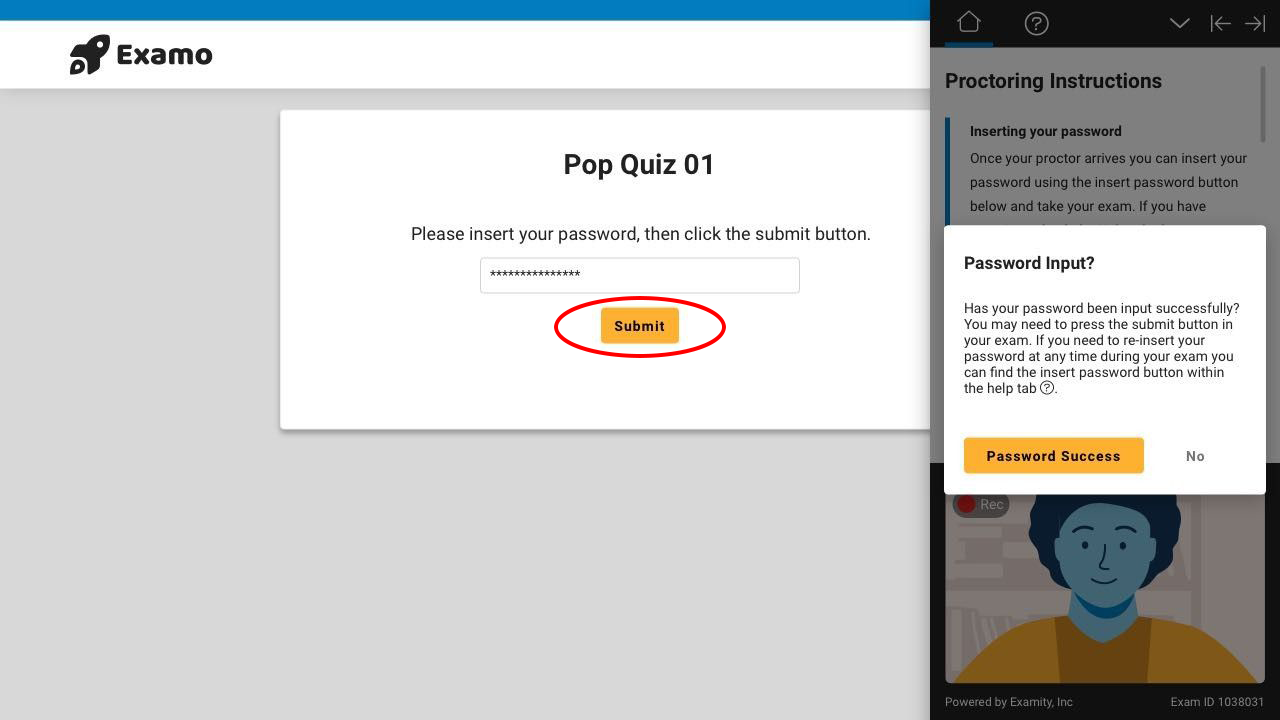
1. Once your exam page loads click on the “Insert Password” button in the sidebar.
2. Once the exam password is inserted, click the submit button to continue. Your test platform may have a different name for this button.
3. Once your password has been submitted click on the “Password Success” button in the sidebar.
Now you’re taking your exam! Goodluck! As a reminder you must be in view of your camera at all times while taking your exam. Once you have completed your exam and have submitted it you will need to end your proctoring session.*
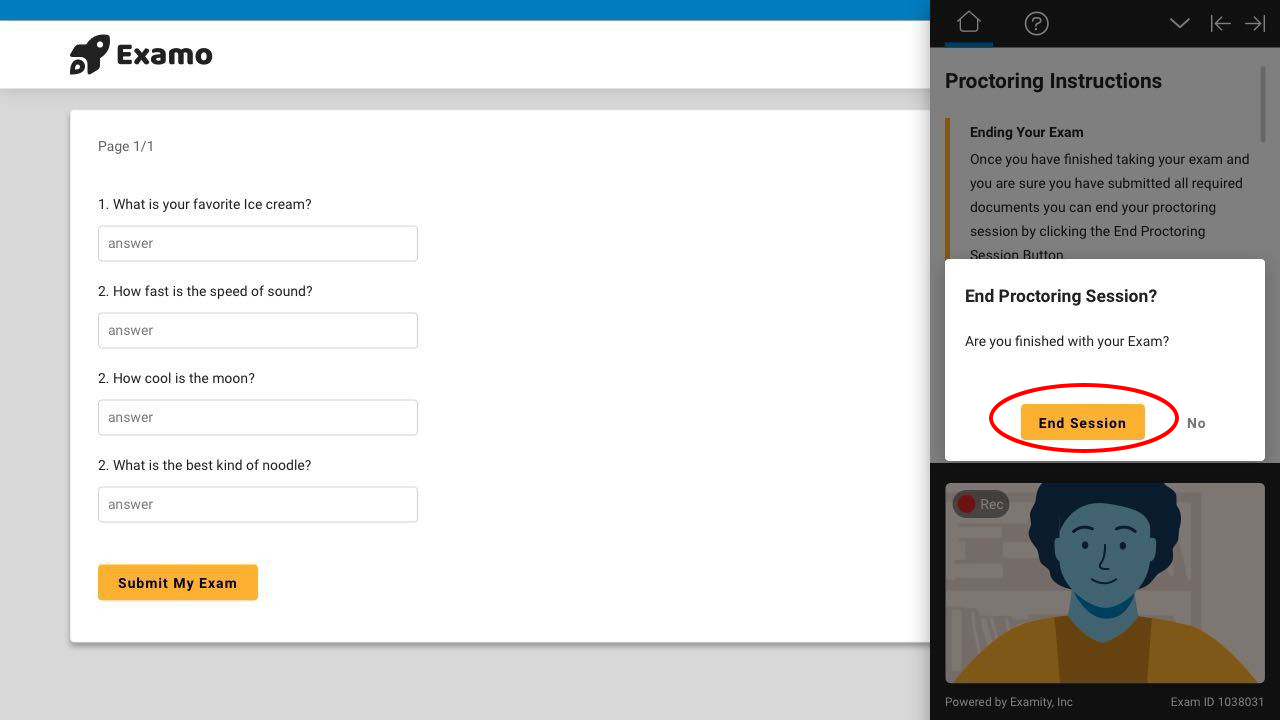
1. Make sure you have submitted your exam, and notified your proctor you are finished if you have a proctor.
2. Once you are prepared click the “End Proctoring Session” button.
3. Click the “End Session” button in the pop up.
This will end your connection with exam and close the browser window. A survey asking you about how we did will appear after you have ended your session.
*Once you’ve finished your exam and submitted it, please inform your proctor that you are done. They will guide you through your post exam processes.
